In a large bowl beat 2 sticks of unsalted butter. Whip on high speed for 1 minute. Next, add 3/4 cup of Bailey's Irish Liquor and 1 tsp of vanilla extract. Beat on low until all ingredients are well mixed. Now for the sugar. Add 3 cups of powdered sugar to the bowl and SLOWLY beat frosting until it is able to form stiff peaks. If you feel that the icing is to runny, add a bit more of the powdered sugar. ENJOY!
Thursday, April 24, 2014
Bailey's Frosting
I'm back in business! I can't believe I ever quit blogging. Over the past two years I've graduated with my Masters in Teaching, moved out on my own, bought my first house, got my first real teaching job, and bought a brand new car:) This girl is growing up! To celebrate, I thought a more 'adult' geared dessert was in order. I made this frosting to go on some devil's food cupcakes for Easter and they disappeared within 5 minutes! Here's the recipe:
Sunday, February 19, 2012
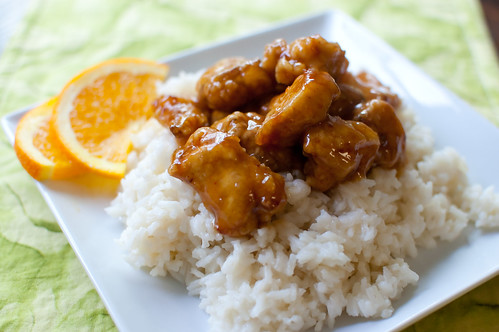
Orange Chicken (GF)
Keeping with an Asian them this week...I found yet another pinterest recipe that sparked my fancy! Of course it took a bit of tweaking to make it gluten free but that part wasn't difficult at all! Just a fair warning though...this dish gets messy to make. So do it on a weekend when you have the energy to actually clean up after it! Haha! But it really was delicious! Here's the recipe:
First you'll need to create the marinade. Take out a large mixing bowl and combine 3/4 cup of chicken broth, 3/4 cup of FRESHLY squeezed orange juice (trust me, it really makes all the difference!), 1 1/2 tsp of orange zest, 6 tbsp of white vinegar, 1/4 cup of gluten free soy sauce, 1/2 cup of brown sugar, 3 minced cloves of garlic, 1 tbsp of either finely grated ginger or powdered ginger (I used powdered ginger and it worked just fine!), 1/4 tsp of cayenne pepper, 2 tbsp of cornstarch, 2 tbsp of cold water, and a few orange peels. Mix together well until the cornstarch has dissolved. Take out 3/4 cup of the marinade and stick it in the fridge. Add in 1-2 lbs of cubed chicken to the rest of the marinade and refrigerate for 30 minutes. Heat up a pot of canola oil (or a deep fryer if you have one) to 350*F. Next you'll make the coating for the chicken. Beat 3 large egg whites in a small bowl until frothy then set aside. In a medium sized bowl, mix together 1 cup of cornstarch, 1/2 tsp of baking soda, 1/4 tsp of cayenne pepper, and a few shakes of garlic powder. Take the marinated chicken and remove it from the excess marinade. Pat the chicken dry with several paper towels. Take only a few cubes at a time and dip them in the egg wash, then in the coating. Shake off any excess coating then drop them into the heated oil. Cook until the coating is golden and the chicken is cooked all the way through, then remove from the oil and place onto several paper towels to drip off any excess oil. Repeat this process until all of the chicken is cooked. In a separate pan, heat up the saved marinade from the fridge. When it is simmering, dump the cooked chicken into the pan and toss until coated fully.Serve over white rice and ENJOY!!
Monday, January 16, 2012
GF Skinny Honey Sesame Glazed Chicken
Apologies for the lack of posts over the past several months! Life has sort of gotten away from me and has just started to come back into a routine! I've just started my student teaching (YAY!) and am currently beginning the job application process so wish me luck! Hopefully I'll end up with a teaching position this fall. Any how, because I'm at the high school for most of the day, I've started planning out my lunches and dinners for the week in advance which has proven to be EXTREMELY helpful and both a time and money saver! My mission is to try out at least one new recipe each week because of this routine, the first of which being this Skinny Honey Sesame Glazed Chicken recipe:) I stumbled across it on pinterest.com (which is an addictive yet wonderfully creative website as most of you already know) and decided to test it out for dinner tonight. DELICIOUS! Seriously, if you are one of those people who orders sesame chicken at Chinese restaurants like I am, save your money and make this at home! Plus, since it's baked it is much healthier than the deep fried and battered kind. Here's the recipe:
Take 1 &1/2 to 2 lbs of boneless skinless chicken breasts and cut them up into one inch cubes. Dust them with flour (gluten free of course!) and shake off any excess. Preheat your oven to 400*F and bake the chicken cubes for 15 minutes in a pan with a bit of a lip on it (I used a jelly roll pan). While the chicken is baking, mix together the sauce... 2 tbsp of low sodium soy sauce, 1/2 cup of honey, 1 tbsp of sesame oil, and siracha (Asian hot sauce) as desired. Remove the chicken from the oven and pour the sauce on top. Stir the chicken so that it is all evenly coated, then place chicken back into the oven for an additional 10 minutes, stirring occasionally to coat everything well. Remove from oven and toss with sesame seeds. Serve over a bed of rice.
ENJOY!
Sunday, November 13, 2011
White Bean Chicken Chili
A few weeks ago, I finally made the trip out to my roommate's home in Richmond, VA. While we were there, her wonderful mother made us this recipe for dinner! This completely changed my view on what chili is and was absolutely delicious (plus gluten free!); not spicy at all, just full of flavor! Served with corn bread it is a great cozy meal, I really encourage you to try it! It makes enough for an army (or a chili cook off!) but you can easily cut the recipe in half like I did and it's just enough for four :) Here's the recipe:
In a large pot, saute one chopped medium onion in about a tbsp of oil for 6-7 minutes. Add in 2 chopped cloves of garlic and saute for an additional 2 minutes. Add in 6-8 boneless skinless chicken breasts that have been cut into bite sized pieces. Cook until the chicken is cooked through and lightly brown. This recipe can be finished up in two different ways; via crock pot or stove top (long vs short cook time!).
For the crock pot, dump the cooked chicken mixture into the slow cooker. Take one can of white beans and put into a blender or food processor. Blend until liquefied, this will act as your thickening agent in your chili! Add to the slow cooker. Also add an additional 3 cans (15 oz each) of rinsed and drained white beans, 1 tsp of salt, 2 tsp of cumin, 1 tsp of chili powder, 1 tsp of pepper, 1 tsp of oregano, 1 can of chicken broth (16 oz), 1 16oz package of frozen corn, 1 can (4.5 oz) chopped green chili, 1 chopped red or green pepper. Mix ingredients well and cook on low for 6-8 hours.
For a quicker version, cook on the stove top! Add all ingredients into the large pot that the chicken was originally cooked in and bring to a boil. Then lower heat and simmer for 30 minutes.
You can top with cheese, sour cream, green chives, cilantro, lime juice, corn bread, etc.!
ENJOY!
Sunday, November 6, 2011
Smothered Pork Chops (G.F.)
The other day I went into the freezer and pulled out some boneless pork chops to make for dinner that night. I went online in search of a tasty recipe for them and stumbled across this one! Again, another food network steal, this one by Tyler Florence. This recipe took my idea of pork chops to a whole new level. Definitely worth the time to make them! Serve them up with some mashed potatoes and you have a real 'comfort food' type meal. Here's the recipe:
Take your pork chops (bone in or boneless are fine!) and dry them off with a few paper towels. In a small mixing bowl, blend together 1 cup of flour (I used King Arthur Gluten Free All-purpose Flour!), 2 tbsp of onion powder, 2 tbsp of garlic powder, 1/4 tsp of cayenne pepper, 1 tsp of kosher salt, and 1/2 tsp of fresh cracked pepper. Once the dry ingredients are all mixed together, dredge the pork chops in the mixture, covering all sides of each. Next, heat a skillet with about 1/4 cup of e.v.o.o to medium heat. When the skillet is nice and hot, place each of the pork chops into the pan. Cook for approximately 4-5 minutes per side or until both sides are golden brown. Remove the pork chops from the pan. Add a few tsp of the left over dry mixture to the drippings left over in the skillet. Stir until the mixture becomes thick, then add 1 cup of chicken broth. Let the mixture simmer for about 5 minutes so as to let it reduce down. Add 1/2 cup of milk (I actually used soy and even Ryan couldn't tell the difference!) to the pan and stir together well.Once the gravy has thickened, place the pork chops back into the pan with the gravy. Allow to simmer for another 5 minutes or until the pork chops are cooked through. Serve and ENJOY!
Sunday, October 30, 2011
Slow Cooker Chicken
So today ended up turning into a much busier day then I had originally planned. I was going to roast a whole chicken that I had in the fridge, but wasn't going to be home long enough to keep an eye on it. To the internet! Food network once again just saved my dinner plans via the glorious crock-pot! This one came from Emeril Lagasse and was a really tasty and easy meal that fit into the comfort food category perfectly. Definitely try this recipe on a cool day when you want to come home to a hot meal! Here's the recipe:
Take your whole chicken and remove the neck and giblets. Rinse the chicken well with cool water both inside and out then pat dry with a few paper towels. Place the chicken into the crock-pot and salt and pepper both sides generously. On top of and around the chicken, add 1/2 cup of diced onion, 1/4 cup of baby carrots, 1/4 cup of diced celery, the juice of one lemon, 3 sprigs of thyme, 3 pealed and smashed cloves of garlic, and a few dashes of onion powder (this was my own addition just to add another layer of flavor!). Turn the crock-pot up to high and allow the chicken to cook for approximately 6 1/2 hours. When the chicken is finished, remove it and the veggies and plate them up nicely. Pour the chicken juices and drippings into a sauce pan and skim off the fat from the top. Add 4 tsp of cornstarch to a small bowl along with a few tsps of water to create a slurry. Add the slurry to the heated juices in the sauce pan and stir together well. Heat the gravy for approximately 4-5 minutes or until it begins to thicken. Pour over top of the chicken and serve!
ENJOY!
Sunday, October 23, 2011
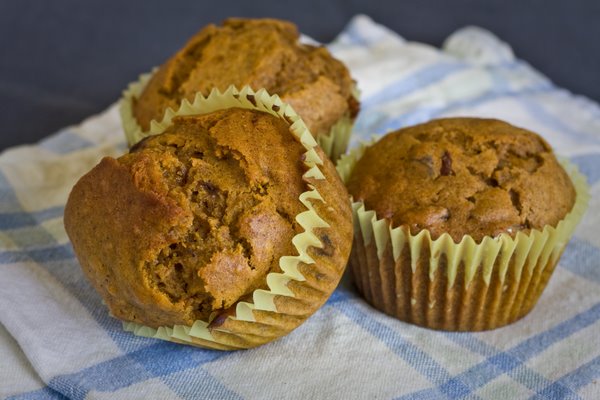
G.F. Pumpkin Muffins
Fall is one of my favorite times of year! The leaves changing color, the days cooling off, and all of the phenomenal foods and flavors that comes along with it. One of the key tastes of fall is pumpkin, so I wanted to make a nice festive treat for brunch the other morning with two of my best friends! They turned out great and really were a great addition to my fall recipe list! Here's the recipe:
Preheat your oven to 375 degrees Fahrenheit. Line your muffin tin with paper liners. In a large bowl, whisk together 3 eggs, 2 tbsp of molasses (regular pancake syrup will work great too!), and one 15oz can of pumpkin. Set the bowl aside and get out another bowl. In the second bowl, whisk together 1 cup of brown rice flour, 1/2 cup of potato starch, 1/4 cup of tapioca flour, 1 cup of sugar, 2 tsp of baking powder, 1/2 tsp of xanthan gum, 1/2 tsp of salt, and 2 tsp of pumpkin pie spice. Then take 1 stick of softened butter and mix it into the dry mixture, the texture should be crumbly. Add in the liquid ingredients to the dry ingredients a little at a time mixing well after each addition. Once all of the ingredients are added, beat for 1-2 minutes, until the batter is fluffy. Fill up the muffin cups until almost full. Bake for 25 minutes or until the center muffin springs back when lightly touched. Remove from the oven and transfer to a cooling rack.
ENJOY!
Wednesday, October 5, 2011
Mojito Chicken
If you want a chicken dish that will knock your socks off, this recipe is it! It's another twist on one of Guy Fieri's recipes from Food Network, and you will not be sorry you tried it. The marinade alone will be something that will become a staple for how I prepare chicken in the future, and it would make veggies and shrimp taste incredible too! Please please please try it! Here's the recipe:
Take a whole chicken and remove the innards entirely. Turn the chicken so that it is breast-side down and remove the backbone with a pair of kitchen shears. (This is really simple, just cut right up the back of the chicken from bottom to the neck on both sides of the backbone!). Rinse the chicken well with cold water and then pat dry with paper towels. Flatten the chicken so that the insides are facing the cutting board and the breast, legs, and wings are all facing you. You want your chicken to be able to lay flat in a skillet! In a separate bowl, mix together 2 tbsp of garlic powder, 1 tbsp of onion powder, 1/4 tsp of ground cumin, 1 tbsp of dried oregano, 2 tbsp of kosher salt, 1 tbsp of black pepper, and 1 tsp of paprika. Take your chicken, and shove the spice mixture up under all of the skin (this is key so make sure you lift the skin as much as you can without tearing it and coat it well!). Use the remainder of the spice rub and coat the rest of the chicken (skin, insides, everything!). Place the whole chicken into a resealable plastic bag and place in the refrigerator for at least 30 minutes. In a separate large bowl, mix together the following ingredients for your marinade, 1 cup of orange juice, 2 limes (juiced), 1/4 cup of white wine vinegar, 1/4 cup of extra virgin olive oil, 1 tbsp of sliced fresh garlic, 1/4 cup of dark rum. Add your marinade to the bagged chicken and let refrigerate for at least an hour. Preheat your oven to 350 degrees.Take your chicken out of the bag and let all of the excess marinade drip off of it. While you're doing this, heat a large skillet to medium/high and add 4 tbsp of e.v.o.o. Place your chicken into the skillet skin side down first making sure that the entire chicken is laying flat in the pan. Allow for the skin to become golden and crispy, then flip the chicken over, add 1/4 cup of your used marinade to the pan, and cook until well seared. Place your entire skillet into the oven (make sure its oven safe first!) and cook the chicken for approximately 40 minutes or until your instant read thermometer reads 165 degrees. When finished, turn on the broiler and cook the chicken under it for 5 minutes. Remove from the oven, serve, and
ENJOY!
Wednesday, September 28, 2011
Pot Roast (GF)
The gluten free queen is back in business! Apologies for the long sabbatical from blogging, but with the new semester starting up I've hardly had time to do anything for myself. The other night I decided I was going to use my trusty crock-pot so that I'd have a nice hot meal to come home to and I'm so glad that I did! Pot roast is so easy and delicious and I really encourage everyone to try out this recipe!
In a large crock pot, chop up 4-5 medium sized potatoes (any kind will work, just make sure they're washed well!) Place them in the bottom of the crock pot. Next, dump a small bag of baby carrots on top of the potatoes. On top of THAT place your meat, any nicely marbled piece will work just fine! Now, because I make mine gluten free, I can't use the Lipton Onion Soup mix that so many others do (it contains barley!). So instead I roughly chop up one medium sized onion and throw that on top of the meat. I season the meat well with salt, pepper, and 2 tbsp of onion powder. Then I add 1 & 1/2 cups of water, and 2 tbsp of Gravy Master's liquid to the pot. Place the lid on to the crock pot and set it to low. Cook for 8-10 hours and
ENJOY!
Saturday, September 3, 2011
Brick Chicken with Salsa Verde
For those of us who like to cook, it seems that our major commonality is that our televisions are always set to the food network! It's such an incredible resource for new recipes, new ideas, and new techniques to use in the kitchen. This recipe is a spin off of one of my favorite chefs, Guy Fieri's, recipe. It's skillet brick chicken and it's absolutely delicious! I made this as a "welcome to the apartment" dinner for our new roommate and she seemed to really enjoy it as well! Here's the recipe:
Take one pound of chicken (the recipe called for a whole chicken but I only had boneless skinless breasts on hand so that's what I used!). Slice two pockets on both the top and bottom of the breasts so that there is just a thin flap of meat on both sides, this is where you'll apply the rub so that it doesn't burn when it's cooked! In a small bowl, mix together 1 tsp dried rosemary, 1 tsp paprika, 1 tsp of salt, 1 tsp of granulated garlic, 1/2 tsp of dried oregano, 1/2 tsp of dried sweet basil, and 2 tbsp of extra virgin olive oil. coat both pockets of the chicken (inside only!) with the rub. Heat up a skillet to medium high and put a splash of e.v.o.o. into it. Place the chicken breasts in the pan, then stack ANOTHER skillet on top of the breasts. Place a few bricks into the top skillet so as to keep alot of pressure on the chicken below. Allow the chicken to cook on each side for approximately 5-9 minutes or until cooked through. For the salsa verde to put on top, get out your food processor and blend together 1/2 cup of fresh basil leaves, 1/2 cup of fresh parsley, a pinch of cayenne pepper, 1 tbsp of minced garlic, 1 tbsp of sauteed chopped onion, 2 tbsp of lemon juice, 1/3 cup of e.v.o.o.. Blend until you've created a paste and top your cooked chicken with the salsa verde.
ENJOY!
Tuesday, August 30, 2011
Stuffed Bell Peppers
I was never a very big pepper eater until very recently, and since then it seems that I love to add peppers into anything! Now keep in mind that there are dozens of ways to make stuffed peppers but I definitely enjoyed this one! Here's the recipe:
In a large skillet, cook up approximately 1/2 a pound of ground sausage. Add to the nearly finished cooked sausage 1 tsp of minced garlic, and 1/2 of a chopped onion. Saute the mixture together until the onions have softened. Add in 2 cups of cooked rice and mix together all ingredients. Take four bell peppers (any color you like!) and cut the tops off. Remove all of the insides (seeds and ribs) and stuff each pepper with the mixture. In a small bowl, mix together 2 slices of gluten free bread crumbs, and 1/2 cup of Parmesan cheese. Sprinkle the mixture over top of the stuffed peppers and move your peppers to a cookie sheet. Bake at 350 degrees F for 30 minutes. Serve hot and
ENJOY!
Saturday, August 27, 2011
Italian Chicken & Vegetable Stir Fry
I find that more and more often I find excuses for why I don't want to make dinner, the main culprit being that I'm to busy. When this happens, dinners also tend to get less and less healthy and well balanced. I've finally solved this age old dilemma with this wonderful recipe! It's absolutely delicious, very colorful, and extremely healthy. So take 15 minutes and whip up the quickest dinner ever. Here's the recipe:
Bring two cups of salted water to a boil. Measure out 2 cups of rice (white or wild rice would work fine!) and pour into the boiling water. Stir and cover with a lid and remove the pot from the burner. Let the rice sit for at least 5 minutes to fluff up. In a large oiled skillet, cook up 2 chopped up boneless skinless chicken breasts. Add in 1 cup of chopped baby bella mushrooms, 1 cup of chopped green zucchini, 1 cup of chopped yellow squash, and 1/2 cup of chopped red bell pepper. Place a lid on the skillet and steam the mixed veggies and chicken for 5 minutes. Remove the lid and add in 3 tablespoons of Philadelphia cream cheese Italian blend cooking cream (this stuff is incredible in so many different dishes) and the cooked rice. Stir everything together, allow the mixture to cook for another minute or two, and then serve hot.
ENJOY!
Thursday, August 25, 2011
French Toast (G.F.)
French toast is another one of those staple breakfast foods that I loved to eat growing up. But of course, it's not exactly gluten-intolerant friendly as is. So I've come up with a way to make it gluten-free with out compromising any flavor! This recipe could of course be used with regular bread also if desired! Here's the recipe:
In a small bowl, mix together 2 eggs, 1 tsp of vanilla extract, 1 tbsp of cinnamon, a dash of nutmeg, and 1/4 cup of milk (I'm sensitive to dairy too so I use soy milk and it works great!) Whisk everything together and set aside. Heat up a large skillet on the stove and butter it well when hot. Take your bread of choice (I use whatever gluten free breads I can find at the grocery store at the time) and dunk each piece into the wet mixture. Make sure you coat all sides of the bread really well. Lay the soaked piece of french toast onto the griddle and cook until the bread starts to brown a bit. Flip the toast over and continue to cook until the toast is cooked through. Serve with powdered sugar or syrup and
ENJOY!
Thursday, August 18, 2011
Sausage Pepper and Cheddar Omelet
I love breakfast foods! There are so many different kinds and a million different ways to mix up the traditional go-to recipes. This is one that I made for myself the other morning for breakfast. The best thing about omelets...you can use up those leftovers you have hanging out in the fridge! So go ahead and raid your refrigerator and start cooking. Here's the recipe:
Crack three large eggs into a bowl and whisk them well. Add in 1 tsp of salt and 1/4 tsp of black pepper and whisk again and set aside. Heat a large skillet on medium/low heat. Put a small pat of butter into the skillet and let it melt. Add in 1/2 of a diced red pepper, 1/4 cup of diced sausage (I used sausage I had already cooked up the day before and had left over!). Saute the peppers and sausage until the peppers soften up a bit. Next, pour your eggs in over top of your peppers and sausage. Rotate the pan so that the eggs runs in between all of the veggies and meat. Cook until you would normally flip the omelet over. Now here's the trick, don't flip! Throw about 1/4 cup of sharp cheddar cheese on top of the gooey part of the omelet, then cover the skillet for another minute or so. This will finish cooking the top of the omelet while melting your cheese at the same time. When the omelet is cooked through, simply slide it out of the skillet onto a plate and fold it over as you do so, this will prevent your omelet from completely falling apart since you've filled it with so many yummy goodies! Serve with your favorite side breakfast items and
ENJOY!
Wednesday, August 17, 2011
Spaghetti Sauce
Pasta is such a versatile ingredient when it comes to the number of different sauces you can pair it with. But this is the traditional sauce that most people think of when they talk about a meat sauce. This is actually my mom's recipe that I tweeked just a tad but I stuck pretty close to her original recipe overall! You can pair this recipe with pretty much anything from spaghetti to lasagna, baked ziti to stuffed shells. It tastes fantastic, is super simple, and is wayyy better than any of that junk you get out of a jar! Plus, since this batch provides a great deal of leftovers, I love to store the rest of it in Ziploc baggies in the freezer so you can have homemade meat sauce whenever you like! Here's the recipe:

In a deep pot, heat up about 2 tbsp of extra virgin olive oil. Dice up a medium sized onion and toss it in the pot. Add in 2 cloves of freshly minced garlic and stir together. Saute the onions and garlic until the onions start to caramelize. Add in 1 pound of 90/10 ground beef and mix together well. Cook until the meat is well browned then dump the mixture into a colander and drain off any liquid. Toss the mixture back into the pot and add in 1 large can of diced tomatoes, 1 medium can of diced tomatoes, 1 medium can of tomato sauce, 2 large tbsp of tomato paste, 1 tbsp of sugar, 2 tbsp of parsley, 2 tbsp of oregano, 1 tsp of basil, 1 tsp of salt, and 1/2 tsp of pepper. Stir everything together really well then lower the heat allowing the covered pot to simmer for approximately three hours. Stir every so often. Serve over your favorite pasta and
ENJOY!
Monday, August 15, 2011
Buffalo Wings
The fall is almost here, and you know what that means...football season! My family and I are all die hard Redskins fans so football has always been a great way to bring us all together. Appetizers also seem to go hand in hand with football season in our home! These Buffalo wings are another one of my family's recipes that I love to make. Whether it's myself, or a whole house full of people for a Superbowl party, this dish works great for all party occasions!
Preheat your oven to 375 degrees F. Grab a baking sheet and cover it in heavy duty tin foil (this will help shorten your clean up time!). Then place a metal rack that you would usually use in a roasting pan and place it on top of the baking sheet. Take your wings (frozen are fine if you don't have fresh but you must defrost them prior to baking!) rinse them well with cool water, and space them out evenly across the rack. Salt and pepper the wings well then place them in the oven for 1 hour. Next, place the baking sheet on the top rack of the oven and start the broiler. Broil the wings just until they start to turn golden brown. This will happen very quickly so be sure to keep a close eye on them! Take the baking sheet out of the oven and turn the wings over. Broil the other side of the wings then remove from the oven. Pour about half a bottle of your favorite buffalo wing sauce into a large bowl then place the cooked wings in as well. Toss the wings around in the bowl until they are all evenly coated in the sauce. Next, either plate the wings or stick them into a crock pot on the warm setting if you are making several batches! Serve with blue cheese or ranch dressing.
ENJOY!
Thursday, August 11, 2011
Banana Chocolate Chip Muffins (G.F.)
Yay for being able to bake again! I was hungry last night so of course, I ended up in a baking mood :) We had just gotten the latest issue of the King Arthur Flour Company catalog in the mail and I found a recipe inside for gf banana muffins! To jazz it up a bit, I decided to add chocolate chips to try to recreate the muffins that I used to get from Starbucks all the time. Hands down, these are the most fantastic muffins I've made yet! My mom's friend was over that evening and she agreed that they were extra delicious. This is definitely one of those recipes that if you didn't already know that it was gluten free you'd never know the difference! This dish is absolutely a keeper. Here's the recipe:
Preheat your oven to 375 degrees F and line your muffin tin with paper liners. In a small bowl, whisk together 2 tsp of baking powder, 1/4 tsp of baking soda, 1/2 tsp of xanthum gum, 1/2 tsp salt, 1/2 tsp of cinnamon, and 1 & 3/4 cups of King Arthur Company: Multi-Purpose Gluten Free Flour. In a separate bowl, beat together 1/2 cup of softened unsalted butter, 2/3 cup of sugar, an 2 tbsp of honey. Beat in 2 eggs (one at a time!) scraping the sides of the bowl between each egg. Next you'll be adding in the dry ingredients. Add in the dry mixture in three parts, alternating with a total of 1 & 1/2 cup of mashed ripe bananas (I used two medium sized bananas!). Scrape the sides of the bowl then beat on medium-high speed for 30 seconds. Stir in 1/2 cup of semi-sweet chocolate chips (you can also add in 1/2 cup of chopped black walnuts if you wish!). Scoop the batter into the paper lined muffin cups filling them each to the top (this batter makes enough for 12 muffins!). Bake the muffins for 25 minutes or until the top springs back when touched lightly. If you want to add a decorative touch to the muffins like I did, you can add a few chocolate chips to the top of each muffin during the last five minutes of bake time! Let the muffins sit in the pan for five minutes after baking then transfer to a cooling rack. Store in an air tight container.
ENJOY!
Wednesday, August 10, 2011
Breakfast Quinoa
Apologies AGAIN for the lack of posts this week! I've been in and out of town for a few days and haven't had time to do any cooking...maybe that's why stress levels are high?? :) But while I was home, I received a wonderful gluten free cook book called The Gluten Free Bible by publications international. It's filled with all sorts of cool recipes that I'm so excited to start trying out! Here's the first that I made this morning for breakfast. It's called breakfast Quinoa (pronouned Keen-wah!), which is a type of gluten free grain that they sell in just about any grocery store. It's been a long time since I've been able to eat any type of warm breakfast cereal such as cream of wheat or oatmeal, so this was a welcome treat! Here's the recipe:
Take 1/2 cup of Quinoa and rinse it well in a fine mesh strainer. Put the rinsed Quinoa into a small pot on the stove and add 1 cup of water, 2 tbsp of maple syrup, 1 tbsp of brown sugar, and 1/2 teaspoon of cinnamon. Heat the pot to a boil and then reduce the heat and cover the pot with a lid allowing the mixture to simmer for 10-15 minutes or until the Quinoa is tender. Add 1/4 cup of golden raisins during the last five minutes of cook time. Serve with milk and slice bananas over the top of the dish.
ENJOY!
Thursday, August 4, 2011
Grilled Zucchini
Zucchini really is one of my favorite vegetables, it's so light and refreshing and just screams summer time to me! So when I found out how many of my friends and family despise it I wanted to find a way to change that. This recipe is beyond simple, tastes great, and lets you use the grill! What more could you ask for? So go pick that zucchini out of the garden because you'll finally be able to make a recipe that everyone will love!
Take your zucchini and slice it into 1/2 inch slices long ways. Using a stick of softened unsalted butter spread a VERY thin layer over both sides, just enough to give it a little flavor! Salt and pepper the top of the zucchini then sprinkle a layer of FRESHLY grated Parmesan cheese of the top. Using freshly grated cheese makes all the difference, trust me! Place the zucchini onto the hot grill on low with the lid shut. Cook for several minutes or until the zucchini's center has begun to soften and the cheese is all nice a melted. Serve to your picky eaters and
ENJOY!
Monday, August 1, 2011
Chicken & Pasta in a Lemon-Basil Sauce
One word describes this dish...bright! It has such a unique flavor that you never find in a pasta sauce but it's really delicious. I recently got hooked on using pinterest.com which has become another recipe resource for me! I stumbled across this dish and it just looked so wonderful I had to test it out! The only alteration that I've made to the recipe from its original version was to cut the amount of lemon juice in the sauce to half of what it had asked for. But overall this dish is super easy, quick, and delicious! Here's the recipe:
Take about a pound of boneless, skinless chicken breasts and pound them out to equal thickness. In a medium sized bowl combine the juice of 4 lemons, 2 tbsp of Dijon mustard, 1 tbsp of honey, 1 tsp of salt, 1/2 tsp of pepper, and 3 tbsp of extra virgin olive oil. Mix well then marinate the chicken breasts in it for 4-6 hours. Once the chicken breasts are finished marinating, heat up the grill and cook on medium-high heat until cooked through. While the chicken is cooking, boil up penne pasta ( I like to use Schar's G.F. Penne) in well salted water. Drain the pasta but make sure to save a cup or two of the pasta water in a small bowl. In the same pot that you cooked up the pasta in, melt 1/2 stick of butter and add the juice of 1 lemon (be careful not to have the pan/mixture too hot here otherwise you'll curdle the dairy that you have to add in the next step!). While stirring, add 1/2 cup of heavy cream and 1/2 cup of half and half. When the mixture is heated through, add 1 and 1/2 cups of grated Parmesan cheese. Continue stirring the mixture until the cheese has fully melted. Add your pasta back into the pot and mix with the sauce. If the sauce is too gooey, add some of the pasta water you put aside and stir together. Repeat this until you reach the right consistency! Add in about 12 leaves worth of freshly chopped basil and stir into the pasta. Plate the pasta and slice the cooked chicken over the top.
ENJOY!
Subscribe to:
Posts (Atom)